Category Archives: Educational

Online School Sites

As a home schooling mother, I am constantly checking out new online sites. Wanna know what sites I have found? I’m glad because I was going to tell you anyway! πŸ™‚


Math:

Funbrain
Sheppard Software
Gamequarium
The School Bell
Cool Math 4 Kids (and it really is cool!)

Typing:

Typing Web (a new favorite)
BBC
Typing game
Peter’s Online Typing Course

Since I got caught up taking typing tests and getting a bit carried away in the process, I am only sharing math and typing sites tonight. Stay tuned for more!

Online Subject Ideas

As a techy(?) homeschooling mom, I am always looking for online ideas that will make learning fun for my children (and for me). I came across 2 cool sites today, thanks to an online friend and fellow homeschooler, Stretch Mark Mama.

Also, here are a few more sites that I use regularly:

January 22, 1973

36 years ago today abortion became legal. About.com summarizes it this way:

The Roe v. Wade decision held that a woman, with her doctor, could choose abortion in earlier months of pregnancy without restriction, and with restrictions in later months, based on the right to privacy.

I know that I have a diverse group of readers, and some of you may be thinking, “Not abortion again. Do I really need to read this?” Stick around, so that, when I ask you if you did your homework, you can raise your hand. πŸ˜€

I have come across a site that explains things in a way I have never heard.Β  Abort73.com* is an organization that

exists to demonstrate the simple truth that unborn human beings are fully qualified to be recognized as persons under the law and be protected from any assault that might befall them.

The video below can be found on their site, so you get a choice. Are you going to watch it here or there? Regardless of where you choose to watch, please help get the word out about abort73.com.

*This site contains some pictures that might turn your stomach, but only if you click on the “pictures that demonstrate” link.

The Empty Pot – A Book Review

In our effort to become more familiar with China and its culture, we have begun to check out children’s books about it at the library.Β  Some of my favorites have been by an author who signs her name on her books simply as Demi. To give you a preview, I will tell you about one of her books called The Empty Pot.

A little boy named Ping has a green thumb and is able to make anything grow. The emperor has no heir, and because he also loves flowers, he uses them to choose the future emperor. Every child who is interested is given a seed and is told to go home, plant it, and come back in one year to show their plant to the emporer.

Although Ping is a wonderful gardner, he is not able to make the seed grow. When the time comes to take his plant to the emperor, he is stopped by several young friends who want to show off their beautiful flowers. Ping sadly takes his empty pot to show to the emperor.

As it turns out the emperor had cooked the seeds to keep them from growing. Ping’s honesty made him stand out and be chosen as next emperor!

What an awesomeΒ  story about the rewards of honesty!

My Favorite Homemade Gift

At the end of a summer mission trip to Colorado I went on in 1998, all the church members from the church we were helping out gave my partner and me small gag gifts. One of my gifts was an eye pillow because it had inspired quite a bit of laughter between one of the ladies in the church and me. Unfortunately, I can’t remember what we were laughing at! I’ll have to dig through my own journals to find out! But that isn’t the main idea of this post. (Some how I get the feeling that some of you are going to make me explain that one later). πŸ˜‰

Several years ago, my beloved eye pillow that had gotten me through many headaches was irreparably torn. I was sad but did not let my sadness keep me from being inspired by the fact that I now knew what the eye pillow was filled with and how to make a replacement.

Turns out that the replacement was so easy to make that I made a bunch and gave them away as gifts. The gifts were well received, and I even got a request to make one for someone else later on.*

So, a homemade eye pillow was one of the favorite gifts I ever received, and quite honestly, one of my favorite ones to give. I felt like I was giving such a personal gift because it is one made with my own hands.

Wondering how to make one? You can find step by step instructions on ehow.com. I didn’t do much more than email back then, so I did not have access to step-by-step instructions. Needless to say, I did not follow these exactly. Here’s what I did differently.

  • Used bird seed instead of flax seed
  • Left out the scented herbs
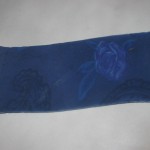
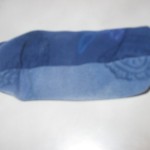
  • Made them 2-tone (meaning sewing all 4 sides instead of just 3)

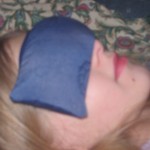
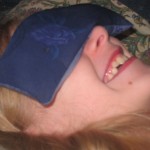
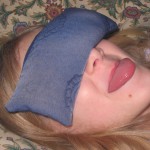
The main thing is to make sure you do not over or under fill your pillow. You want it to have enough room to let the filling settle down over your eyes. If it has too much or too little filling, it won’t work very well. Hopefully you can get an idea of how full it should be by the pictures below. Let me know if you have questions. πŸ™‚


*Unfortunately I can’t remember whether I ever followed through on that request. If you are reading this and requested an eye pillow that you did not receive, please let me know. 😐

Recycled Greetings

This is the time of year when it is common to have so many greeting cards, you don’t know what to do with them all. Kara has some awesome ideas for what to do with them during the Christmas season. But what do you do with them all after Christmas?

A few weeks ago, a friend at church reminded me of a craft that I had totally forgotten existed. If you have use for small boxes, you can make boxes out of Christmas cards.

Wouldn’t it be cool next year to give each person (who sent you a card) a gift wrapped in the card they gave you this year? It would be the perfect size box for giving gift cards, too!

If you don’t want writing on the inside of your box (where the giver signed it), here’s a tip from a commenter on ehow.com. Use card stock or something similar to make the bottoms plain white.

If a Christmas card box is too small for your gift, you can make a gift bag using gift wrap. This site shows you how to make a fancy bag, but you could easily simplify it. And if you are determined to wrap a gift the old fashioned way, you could at least modernize it a tiny bit just for the coolness of it!

Happy Gift-wrapping!!

Making Pinatas – Part 1

Each year at our church’s harvest party, the kids break pinatas full of candy. This year we decided to make our own pinatas and decided to share the process and results with you. Maybe in the process you will learn how to make one for your next birthday party! Stay tuned tomorrow for pictures!

Materials:

  • Several largish balloons
  • plenty of old newspapers
  • flour (self-rising or all purpose)
  • water
  • paint (optional)
  • creative mind (optional)

Directions:

  1. Going with the grain, tear the newspapers into strips about 2 inches wide. Don’t be extra careful with size. Just have fun making a mess.
  2. Decide what shape you want to make, and use your imagination to visualize how you can make the shape with several balloons. If your creative juices aren’t flowing, just go with a pumpkin, ball, or some other round shape and use one big balloon.
  3. Blow up the balloons and arrange them in the shape you imagined.
  4. Make a paste of flour and water, a little thinner than pancake batter (maybe even a bit thinner). It’s pretty hard to mess up the paste.
  5. Dip strips of newspaper, one at a time, in the paste and use 2 fingers (usually pointer and middle finger) to wipe off the excess paste. (Pretty much get as much off as you can without spending too much time on it.
  6. Flatten the wet strips on the balloon in several layers.
  7. Hang the pinata (or lay it flat and rotate after a while)Β  until it has hardened.
  8. Repeat steps 5-7 until the pinata is almost as strong as you want.
  9. When your pinata is almost as strong as you want, attach a string to hang it by. If possible have the string tied around the bottom of the pinata, too.
  10. Repeat steps 5-7 for at least one more layer to cover up and strengthen the string.
  11. Stab the top of the pinata with a knife, and make a hole to add your candy.
  12. Removed the popped balloon and fill your pinata with candy.
  13. Paint your pinata if desired.
  14. Hang up your hard work and let the kids beat it to smithereens. πŸ™‚